From the blog
New Balance 990 QC: Shape, Gray Tones, Label Info
Who This Guide Helps Check QC Photos of the New Balance 990 This guide is for buyers who have already found a New Balance 990 or similar gray New Balance runnin...
Who This Guide Helps Check QC Photos of the New Balance 990
This guide is for buyers who have already found a New Balance 990 or similar gray New Balance running shoe product page on fashion-reps and are ready to click on View QC Photos to examine warehouse images. Your goal is not to determine authenticity from a few photos, but to clearly document any issues you can see after payment and before shipping: whether the shoe shape looks off, the left and right colors are noticeably different, label information conflicts with your size selection, or if flaws need additional photos or resolution.
The images available for verification correspond to the product New Balance ML2002RDA on the fashion-reps page, not the 990 itself. They can be used to illustrate the QC checking method for gray New Balance shoes, but cannot serve as physical evidence for the 990. If you are checking a 990, make sure to go to your own 990 product detail page and open the corresponding gallery from the View QC Photos link on that page.
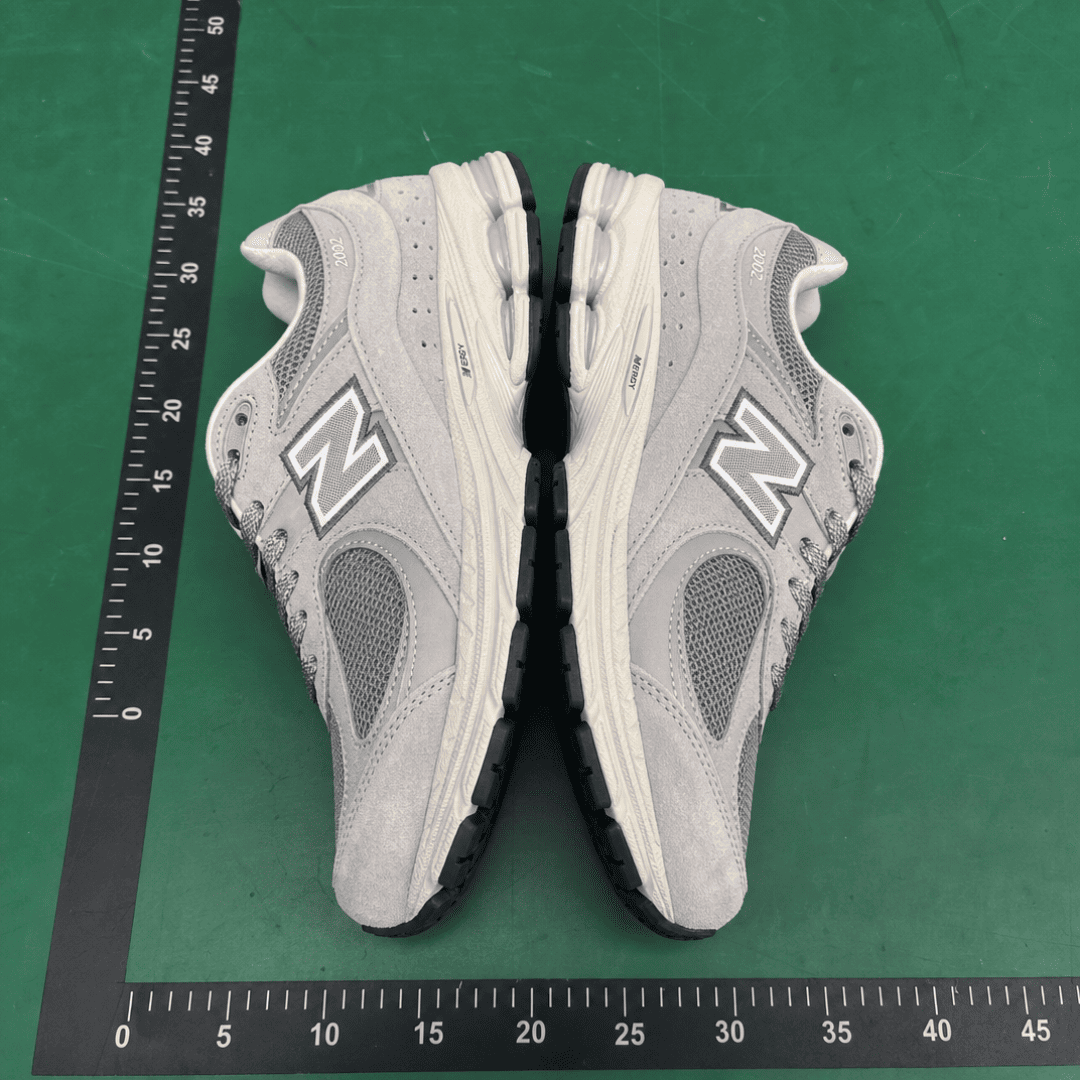
QC photo evidence from a fashion-reps product page, showing the New Balance ML2002RDA; used to illustrate the QC checking process for gray New Balance shoes.
After reading this, you should be able to do four things:
- Determine if the current QC photos are clear enough, and request additional photos if not.
- Record shoe shape, color, labels, and flaws separately, avoiding decisions based solely on first impressions.
- Decide whether to accept, note minor flaws, change size, request a replacement, or pass on this pair.
- Know what conclusions cannot be drawn from QC photos, such as comfort, durability, authenticity guarantees, or long-term color changes.
Evidence Boundaries: QC Photos Show Visible Details, Not Authenticity or Comfort
The most valuable aspect of QC photos is that they let you see the visible condition of the shoes before international shipping. They help you check appearance, size information, left-right consistency, and obvious flaws, but they are not authentication certificates or wear tests.
Visible evidence includes: approximate toe box width, side profile, heel height, suede and mesh color differences, obvious stitching skips, readability of the size tag and shoebox label, and any stains, glue overflow, dents, or pre-shipment damage.
Editorial judgments can only be based on this visible information. For example, you can say, "In these photos, the left toe box looks slightly wider than the right; I suggest requesting a top-down view for confirmation," but not "These will definitely be uncomfortable" or "These are guaranteed authentic." 👟
Verification date: 2026-09-30. Prices, stock, available sizes, agent fees, international shipping, and return windows may change; reconfirm on the product page and agent checkout page before submitting your order.
Getting to the Right Product: Access Original Photos via View QC Photos on the FashionReps Page
The correct process should start from the product detail page, not by guessing the QC photo URL. First, open the target product page on fashion-reps, confirm the page title, product name, size range, and that the buy button points to the correct agent platform, then click View QC Photos.
This step is important for two reasons. First, different New Balance models on fashion-reps may look similar, especially gray retro runners; the proportions and upper structures of the 990, 2002R, 9060, and 1906R are not the same. Second, the QC photos must correspond to the exact item you intend to purchase, or all subsequent judgments will be baseless.
Once in the gallery, prioritize saving or viewing these angles:
- Top-down view: Check toe box width, left-right symmetry, and lace area.
- Outer side: Check N logo position, side curve, sole thickness, and panel proportions.
- Inner side: Check inner panels and midsole lines; avoid looking only at the most flattering outer side.
- Heel: Check height, centering, heel branding, and left-right tilt.
- Size tag and shoebox label: Verify if size, model number, or page info conflict.
- Close-up of flaws: If the original photos are unclear, ask the warehouse for additional photos instead of guessing from blurry images.
Shoe Shape Proportions: How to Assess Toe Box Width, Side Profile, and Heel Height Separately
The core visual identity of the New Balance 990 often comes from a sturdy toe box, a low but supportive side profile, and a restrained heel proportion. When checking, don't just ask "Does it look right?"—break it down into three areas.
First, look at the toe box. Zoom in on the side-by-side photo of both shoes and observe whether the outer edge of one toe box bulges more than the other. Slight differences may come from the camera angle or shoe trees, but if both the front and top-down views show the same shoe is noticeably wider, it's worth requesting additional photos.
Next, look at the side profile. The 990's side should not bulge excessively like chunky sneakers, nor collapse into a straight line. Check whether the midsole height changes naturally from forefoot to heel, and whether the panels near the N logo are pressed down or misaligned. For the visible ML2002RDA photos, they can only be used to practice the method of "zonal observation"; you cannot infer the correctness of the 990's side proportions from them.
Finally, look at the heel. Heel photos should confirm both shoes' heights, heel counter position, and vertical centerline. If one heel is noticeably tilted, or the left and right heights are visibly inconsistent, it's best to request additional front and 45-degree heel photos. 📷
Gray Tones: How to Document Suede Panels, Mesh Color Differences, and Left-Right Consistency
The most overlooked issue with gray New Balance shoes is not whether they are "gray enough," but whether the layering between different materials looks natural. Suede, mesh, leather, or reflective materials naturally have color differences under the same lighting, so don't treat every color difference as a problem.
It's recommended to record by area: toe suede, side mesh, N logo edge, collar, heel counter, and midsole. For each area, first compare the same area on the left and right shoes, then compare different materials on the same shoe. A noticeable difference in the same area between left and right shoes is more concerning than a normal layering effect between different materials.
Acceptable conditions typically include: natural gray tone layering with left and right corresponding positions being close; slight brightness differences between mesh and suede due to material differences; and midsole color consistent across the same set of photos.
Situations requiring additional photos or cautious acceptance include: one shoe is noticeably yellowed or greenish; a suede panel looks water-stained; left and right N logo colors differ; the heel area is darker on one side; or the color difference appears only in a single panel.
Size Tag and Size: Use Label Info, Insole Notes, and Shoebox Info Only as Verification Clues
The size tag and shoebox label help you spot mismatches in size, model number, or order information. They are not standalone authenticity conclusions.
The verification order is simple: first check the size you selected at order, then the size on the QC photo's size tag, and finally the shoebox label or page info for conflicts. If the page's size range, agent order size, and QC size tag do not match, pause shipping and ask the agent to confirm.
If you are size-sensitive, especially with wide feet, high insteps, or between sizes, don't rely solely on EU or US sizes. Try to have the agent note the insole length or request a photo of the insole measurement. Size judgment should be based on the insole length of shoes you already own, not just vague statements like "true to size," "runs large," or "runs small." 📏
Flaw Recording Table: Stains, Glue Overflow, Dents, Stitching, and Acceptability
It's best to write down QC decisions, especially when you're looking at multiple pairs. The table below is designed for you to fill in directly, focusing on separating "what you saw" from "how you plan to handle it."
| Check Item | How to Check | Acceptable Conditions | Suggested Action |
|---|---|---|---|
| Stains | Zoom in on upper, edges, and midsole edge | Small area, hidden location, likely dust | Ask for wipe and re-photo |
| Glue overflow | Look at upper seams and midsole junction | Slight, thin line, not affecting appearance | Note and accept |
| Dents | Look at suede, toe box, and heel support | Minor shipping dents, not exaggerated on either side | Re-photo to confirm if it springs back |
| Stitching | Look at N logo, collar, toe seam | Slight spacing unevenness but no broken threads | Request resolution if obvious skips |
| Left-right inconsistency | Compare both shoes at same angle | Slight camera angle difference | Request photos if obvious height, width, or color difference |
When recording, avoid all-or-nothing words like "perfect" or "trash." A more practical phrasing is: "On the right shoe's outer midsole, there is about a 2 cm glue overflow, visible but not on the front; acceptability depends on whether it can be wiped off." This helps the agent or warehouse understand your request better. ✅
Final Actions: Request Photos, Change Size, Accept Flaws, or Pass on This Pair
After reviewing QC photos, don't rush to choose only "ship" or "return." A more reliable order is to first determine if the information is sufficient, then assess the severity of any issues.
If photos are blurry, angles are missing, the size tag is unreadable, or there is no side-by-side photo of both shoes, prioritize requesting additional photos. This usually saves more time than later returns and reduces misjudgment.
If issues focus on size information, such as size tag not matching the order, unclear shoebox label, or concerns about insole length, have the agent confirm the size or provide an insole photo. Don't guess on size issues, as international returns are typically more costly than domestic shopping.
If there are only minor glue overflow, small stains, or subtle dents, you can decide whether to accept based on price, shipping time, and your tolerance for appearance. Those who should accept are buyers who prioritize fast arrival and overall styling; those who shouldn't accept are buyers sensitive to close-up details, collector display, or perfect left-right symmetry.
If there is obvious left-right asymmetry, large color differences, structural skew, severe stains, or the seller refuses to provide key additional photos, passing on this pair is often safer than shipping an international package with doubts. The final judgment should clearly state: the potential benefit is saving time from reordering and waiting; the added risk is receiving details you cannot accept; this applies to daily wear buyers who can tolerate minor appearance flaws, but is not recommended for buyers seeking strict version details or requiring authenticity guarantees. 🙂
Continue reading